Two options are available for setting up your device so that you’re ready to learn in our workshops with Microsoft Windows.
The first is Git for Windows (often referred to as “Git Bash”), and the second is Windows Subsystem for Linux v2 (“WSL 2”).
If you experience any issues, please install Git for Windows using the instructions below.
Help! What should I use?
We recommend Git for Windows as the default bash experience for Windows users attending our workshops, as it is the most straightforward to install and use, and does not require admin privileges. However, it has limited functionality compared to a full Linux environment, and when you continue your data science learning after the workshop you will find that Git Bash does not support all the tools and workflows you might need. We recommend that after the workshop, you consider installing WSL 2 to get a more complete Linux experience within your Windows environment, and to have access to the full range of tools and software available on Linux.
Checking your Windows Version
Click on the Windows Start Menu button in the bottom left corner of your screen, or tap the Windows button on your keyboard, and type “System” in the search bar.
Click the “System (Control Panel)” option.
In the window that opens, there will be information about your current Windows system, including the version. Here is an example from Windows 11:
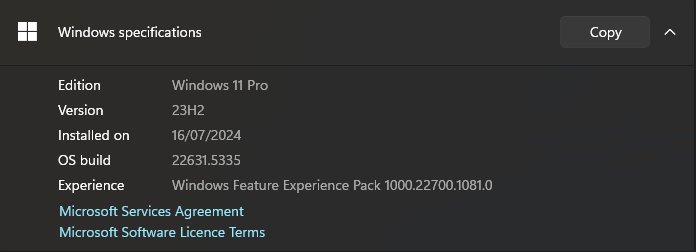 Depending on your version, please go to the relevant instructions below.
Windows XP/Vista/7/8
These versions of Windows are considered End Of Life, and are not recommended for use in modern data science.
Software may experience issues, and security updates are also not available which puts your machine at risk.
Please consider upgrading your Windows version if you are able to do this yourself, or speak with your local IT administrator to discuss options available to you to upgrade.
If you are running any of these Windows versions, please install Git for Windows using the installation instructions below.
Windows 10 (earlier than version #1903)
For older versions of Windows 10 (version 1903/OS build 18362 and below), please follow the Git for Windows installation instructions below.
Windows 10 (version #1903 and later) and Windows 11
Windows 11 and later versions of Windows 10 support WSL 2, so following the workshop where you will use Git Bash, we recommend that you consider installing WSL2. If you are not comfortable installing WSL 2, please follow the Git for Windows installation instructions below.Installing Git for Windows
- Download the Git for Windows installer.
- Run the installer and follow the steps below:
- Click on "Next" four times (if you see "Install" instead of "Next", uncheck the box "Only show new options", then click "Next" two times). You don't need to change anything in the Information, location, components, and start menu screens.
-
From the dropdown menu, "Choosing the default editor used by Git", select "Use the Nano editor by default" (NOTE: you will need to scroll
up to find it) and click on "Next". - On the page that says "Adjusting the name of the initial branch in new repositories", ensure that "Let Git decide" is selected and click on "Next". This will ensure the highest level of compatibility for our lessons.
- Ensure that "Git from the command line and also from 3rd-party software" is selected and click on "Next". (If you don't do this Git Bash will not work properly, requiring you to remove the Git Bash installation, re-run the installer and to select the "Git from the command line and also from 3rd-party software" option.)
- Select "Use bundled OpenSSH" and click on "Next".
- Ensure that "Use the native Windows Secure Channel Library" is selected and click on "Next".
- Ensure that "Checkout Windows-style, commit Unix-style line endings" is selected and click on "Next".
- Ensure that "Use Windows' default console window" is selected and click on "Next".
- Ensure that "Fast-forward or merge" is selected and click "Next"
- Ensure that "Git Credential Manager" is selected and click on "Next".
- Ensure that "Enable file system caching" is selected and click on "Next".
- Click on "Install".
- Click on "Finish" or "Next".
-
If your "HOME" environment variable is not set (or you don't know what this is):
- Open command prompt (Open Start Menu then type
cmdand press Enter) -
Type the following line into the command prompt window exactly as shown:
setx HOME "%USERPROFILE%" - Press Enter, you should see
SUCCESS: Specified value was saved. - Quit command prompt by typing
exitthen pressing Enter
- Open command prompt (Open Start Menu then type
This will provide you with both Git and Bash in the Git Bash program.
Installing WSL 2
If you are confident to try installing WSL 2 rather than Git Bash, please use the following instructions.
Admin Privileges
If you choose to install WSL 2, you will need Administrator (“admin”) privileges on your laptop/PC.If you have a device provided by an institution that does not give you admin rights, please either request that they:
- Give you admin rights (temporarily or otherwise) to install WSL 2 yourself OR
- Install WSL 2 for you
We will install Ubuntu via the Microsoft Store.
It is possible to install WSL within the Windows Powershell command prompt, and full instructions are on the Microsoft website.
Note: You will need to restart your computer after installing WSL 2, so make sure you have saved any work.
Why Ubuntu?
Linux comes in many flavours, called “distributions”, and each has its own benefits, features and quirks!
WSL 2 is a fully fledged Linux environment that runs completely within your Windows 10 or 11 operating system. While there are many Linux distributions available to install (e.g. Ubuntu, Debian, Fedora, Mint, Arch, Gentoo, and hundreds more!), WSL 2 only supports a handful of distributions listed above due to the way it needs to be integrated with Windows itself.
So, we will use the default that WSL 2 recommends, Ubuntu.
Via the Microsoft Store:
- Open the Windows Start Menu button in the bottom left corner of your screen (four blue squares), or tap the Win Windows button on your keyboard (between the bottom left CTRL and ALT keys) and search “store”. Open the Microsoft Store.
- In the Microsoft Store search bar, type “wsl ubuntu”, and select the Ubuntu 22.04 or 24.04 option (at the time of writing,
Ubuntu 22.04.06 LTS, orUbuntu 24.04.01 LTS):- If a pop-up window appears asking if you want to make changes to your device, select “Yes”
- The install should proceed, and this can take a few minutes depending on your PC performance and internet download speed.
- Once installed, restart the computer.
- Once restarted, reopen the Windows Start Menu button in the bottom left corner of your screen, or tap the Windows button on your keyboard. In the search bar, type either:
Ubuntu: selectingUbuntu 22.04.06 LTSorUbuntu 24.04.01 LTSfrom the Start Menu will open the bash prompt directly, orTerminal: this will open a new Windows Terminal window, which will look like a blank black window with a blinking cursor waiting for input. Note: This terminal might default to Powershell, and not Ubuntu. If this is the case, click the down arrow in the Terminal window menu bar at the top, and then click Ubuntu 22.04 or 24.04, depending on the version you installed. It will also show keyboard shortcuts (e.g. Ctrl+Shift+1) to open the various prompts available within the Terminal application.
- Follow the Installing software within WSL 2 section below.
Installing software within WSL 2
Once you have installed WSL 2, you will need to install some software within the Ubuntu operating system in order to use it effectively. Make sure you are using Ubuntu by checking you see the bash prompt:
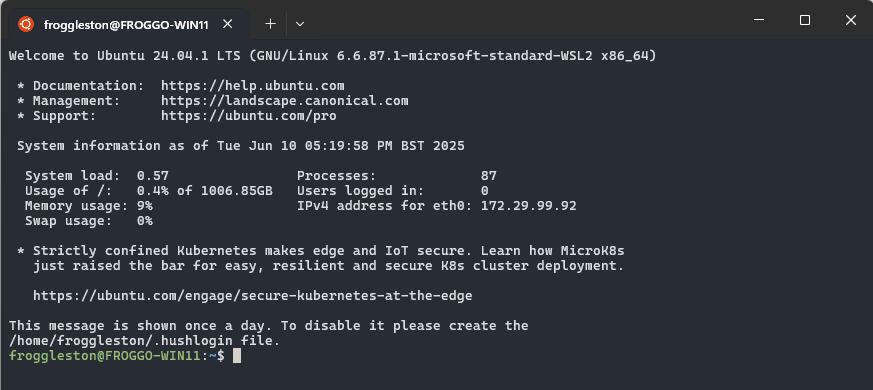
The first thing to do is to update the list of available Ubuntu software packages, using a tool called apt.
Type the following command into the bash prompt:
sudo apt update
Note: You will be prompted to enter your password. This is the password you set when installing Ubuntu, and will not show up on the screen as you type it in. This is a security feature of the terminal, and is normal behaviour.
Install updated versions of the base packages required across all our lessons, by typing:
sudo apt install git build-essential autoconf automake libtool python3 r-base
You're all set!
If you get stuck, please contact your workshop organisers to get assistance before the workshop starts.